Chimney Cap Installation in Virginia Beach, VA and surrounding areas
Prepare for Chimney Cap Installation
Is DIY Chimney Cap Installation Worth The Risk
When considering chimney cap installation or chimney cap replacement, many homeowners think it might be an easy DIY project. However, when you weigh the risks against the potential rewards, it becomes clear that this is not a job for the average homeowner. While you might save a little money upfront, the dangers associated with chimney cap replacement far outweigh any cost savings. This article will explain why attempting to install or replace a chimney cap yourself carries significant risks and why hiring a professional is the best option.
The Risks of DIY Chimney Cap Installation and Replacement
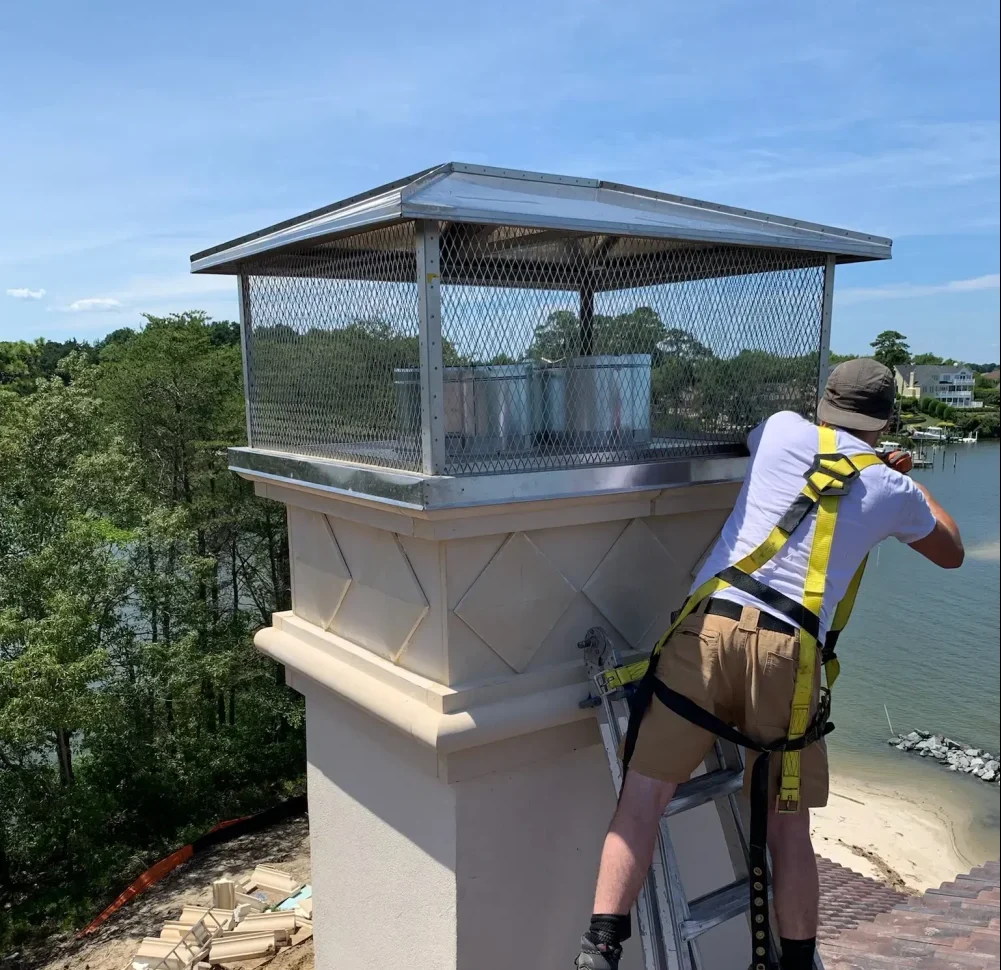
Replacing or installing a chimney cap involves working at heights, which always carries a risk of falls and serious injury. Without the right safety equipment, such as harnesses, ladders, or scaffolding, even experienced DIYers put themselves in harm’s way. Factors like steep roofs, wet surfaces, or strong winds can make working on a chimney especially dangerous.
In addition to personal injury risks, an incorrectly installed chimney cap can lead to other problems. For example, a poorly fitted cap may allow rain to enter the chimney, causing water damage, or leave gaps for pests to enter your home. The risks involved with improper chimney cap installation are high, making it essential to get the job done correctly the first time.
Essential Equipment for Safe Chimney Cap Installation
If you still plan on attempting a DIY chimney cap replacement, it’s crucial to have the right tools and safety equipment. Here’s what you’ll need:
- Roof harness system: Provides fall protection when working at heights.
- Lanyards and anchor points: Keep you securely attached to the roof.
- Non-slip roofing boots: Essential for traction on steep or slick surfaces.
- Safety helmet: Protects against head injuries.
- Extension ladders: Depending on the height of your roof, a ladder is needed to reach the chimney (prices range from $300 to $1000).
- Ridge hooks: These hooks stabilize your ladder on steep rooftops (typically $100 to $300).
- Scaffolding: In some cases, scaffolding may be necessary to safely reach the chimney. Significantly increasing equipment costs.
- Cordless drill and hand tools: Needed to secure or remove the chimney cap.
Purchasing all this equipment can range from $1500 to $2500, and you can find these tools at stores like The Home Depot, Lowe’s, and Amazon.
The Cost of Equipment vs. Hiring a Professional
Purchasing all the necessary safety equipment for a chimney cap installation or chimney cap replacement can result in a large upfront investment. Between extension ladders, roof harness systems, ridge hooks, scaffolding, and specialized tools like cordless drills, the total cost can quickly add up to $1500 to $2500—or even more. This doesn’t account for the time it takes to research and acquire the right equipment, nor the learning curve involved in using it safely and effectively.
On the other hand, hiring a professional for chimney cap installation is a one-time expense that comes with none of the hassle or risks associated with doing the job yourself. A certified chimney technician already has all the necessary tools and safety gear on hand, which means you won’t have to spend extra on equipment you may never use again. Not only does this save you the initial financial investment, but it also saves you from the risk of injury or costly mistakes from improper installation.
By letting a licensed and insured professional handle your chimney cap replacement, you ensure the job is done right the first time—ultimately saving you time, money, and worry in the long run.
Preview our chimney cap photo gallery here:
Why Hire a Professional for Chimney Cap Installation
Why Hiring a Professional for Chimney Cap Installation Is the Smarter Choice
Although the idea of saving money by attempting a DIY chimney cap installation may seem appealing, the reality is that the risks and potential costs far outweigh the initial savings. While you might think that replacing a chimney cap is a simple task, it involves several safety hazards and technical expertise that most homeowners don’t have. Choosing to hire a licensed and insured professional is not only the safer choice but also the most cost-effective in the long run.
The Expertise and Equipment Professionals Bring
Professional chimney technicians have the expertise, experience, and specialized equipment needed to perform chimney cap replacement safely and efficiently. Installing a chimney cap requires working at heights, navigating steep roofs, and using safety gear like harnesses, ladders, and scaffolding—equipment that the average homeowner is unlikely to own or be familiar with. Chimney professionals have this equipment readily available, ensuring the job is completed safely without the added risk of injury.
In addition to safety, professionals understand how to properly install the cap to prevent common issues like water leaks, blockages, and animal infestations. Improperly installed caps can lead to costly problems down the line, including water damage, structural issues in the chimney, and pest entry. A professional ensures that the cap is properly fitted, sealed, and secured, preventing these issues from occurring.
Peace of Mind with Professional Installation
By hiring a certified technician, such as the experts at Premier Chimney and Roofing, you gain more than just technical expertise—you gain peace of mind. Professionals offer warranties on both parts and labor, meaning that if any issues arise after the installation, they will be covered. This reduces the chances of unexpected repair costs down the line and ensures that the job is done right the first time. Without a warranty, DIY installations leave homeowners responsible for any mistakes, which can lead to expensive fixes.
Additionally, professional chimney services ensure that the chimney cap complies with local building codes and safety standards. This is particularly important for maintaining the structural integrity of the chimney and preventing fire hazards. Licensed and insured technicians are well-versed in these regulations, giving you confidence that your home is safe and up to code.
Cost Savings in the Long Run
While hiring a professional for chimney cap replacement involves a one-time expense, it’s often more cost-effective than purchasing all the necessary safety gear and tools yourself. The cost of buying ladders, ridge hooks, harness systems, and scaffolding can easily exceed $1500-$2500, and this doesn’t include the potential for mistakes that could lead to even more costly repairs. With a professional, there’s no need to make a large upfront investment in equipment you may never use again.
Beyond the financial savings, consider the time and effort required to research, purchase, and learn how to use this equipment. Professionals have everything they need on hand, saving you time and ensuring the job is done efficiently. By investing in a professional service, you ultimately save money and protect your home from potential damage caused by improper installation.
The Safer, Smarter Option
In the end, the benefits of hiring a professional for chimney cap installation far outweigh any perceived savings from a DIY approach. Professionals bring the necessary equipment, technical know-how, and warranties that ensure the job is done right and safely. By trusting licensed and insured technicians, like those at Premier Chimney and Roofing, you protect your home from future damage and costly repairs, saving both time and money in the long term.
Preview our chimney cap photo gallery here to see our chimney cap installations.
How a Chimney Cap is Replaced
Although we strongly recommend professional installation, here’s how chimney cap replacement is typically done for three common types of caps:
Masonry Chimney Cap Installation
- Removing the Old Cap:
During a chimney cap replacement for a masonry chimney, the first step is to remove the old cap. A cordless drill or wrench is used to unscrew the fasteners that hold the cap in place. If the old cap is secured with mortar, a chisel may be required to gently break the seal without damaging the chimney crown or flue. Careful removal ensures the masonry is not compromised during this chimney cap installation process. - Inspecting the Chimney Crown:
Before installing the new cap, the chimney crown is inspected for any cracks or damage. The chimney crown is the sloped surface at the top of the chimney, designed to keep water out. Any visible cracks or wear must be repaired before proceeding with the chimney cap installation. This inspection is crucial for maintaining a watertight seal and preventing water damage, which can lead to more extensive repairs down the road. - Installing the New Cap:
Once the crown is inspected and repaired (if necessary), the new masonry chimney cap is fitted over the flue. The cap must be the right size to cover the chimney and prevent water, debris, and animals from entering the flue. During this chimney cap installation, waterproof silicone adhesive or mortar may be applied to ensure a secure and watertight seal. - Securing the Cap:
To complete the installation, stainless steel screws are used to secure the cap to the masonry flue or chimney crown. Stainless steel is the preferred material due to its rust resistance, ensuring the cap remains firmly in place for years. Properly securing the cap is essential to prevent leaks and provide long-lasting protection against weather and debris.
Multi-Flue Chimney Cap Installation
- Removing the Old Cap:
For a chimney cap replacement on a multi-flue chimney, the process begins by using a cordless drill to unscrew the old cap, which is typically bolted to the chimney with L-brackets or straps. Careful removal is important to avoid damage to the chimney structure or the flue liners. - Inspecting the Flue Liners:
After removing the old cap, the technician will inspect the flue liners for any signs of damage or blockage. Flue liners are critical for directing smoke and gases out of the home, so any cracks or damage must be addressed before the new chimney cap installation. - Installing the New Cap:
The new multi-flue chimney cap is carefully placed over the chimney, ensuring it covers all flue openings. Masonry anchors are pre drilled and installed into the masonry sides of the chimney, providing a secure base for the cap. This design helps keep out rain, debris, and animals while maintaining proper airflow. - Securing the Cap:
Masonry screws are used to fasten the cap to the masonry anchors, ensuring a tight, secure fit. Proper installation is crucial to prevent leaks and ensure that the new cap provides durable protection. A snug fit also ensures that the chimney cap replacement withstands high winds and harsh weather conditions.
Prefab Chimney Cap Installation
- Removing the Old Cap:
For prefab chimneys, a chimney cap replacement involves unscrewing the old cap with a cordless drill or hand tools. Prefab chimney caps are typically attached to the flue pipe or chase cover. During this process, the technician takes care not to damage the surrounding chase cover or flue pipe, which may already show signs of rust or wear. - Inspecting the Chase Cover:
Before the new cap is installed, the chase cover is inspected for signs of rust or damage. The chase cover is the flat, metal piece that sits on top of the chimney structure and helps prevent water from entering the chimney. If rust or significant wear is found, replacing the chase cover along with the chimney cap is recommended for complete protection against leaks. - Installing the New Cap:
The new prefab chimney cap is designed to fit securely over the flue pipe or chase cover. Depending on the cap’s design, it may either snap into place or require screws for installation. Proper alignment is critical during this chimney cap installation to ensure optimal coverage and protection from the elements. - Securing the Cap:
Finally, sheet metal screws or clamps are used to secure the new prefab chimney cap to the chimney chase or flue pipe. Stainless steel is chosen for its durability and resistance to rust, ensuring a long-lasting and secure chimney cap replacement. A well-secured cap helps protect the chimney system from water leaks, debris, and animal intrusion.
Conclusion
Whether it’s a masonry, multi-flue, or prefab chimney, a proper chimney cap installation is essential for protecting your chimney from weather, debris, and pests. By following these steps and using high-quality materials like stainless steel, homeowners can ensure their chimney system remains efficient and well-protected for years to come. If you notice any signs of wear or damage to your chimney cap, it’s important to schedule a chimney cap replacement to maintain the integrity of your chimney system.
Preview our chimney cap photo gallery here to see our chimney cap installations.